This article outlines the process of adding team members with different levels of access to your Smeetz account.
1. How to add members
To add team members, you will need to add the email address of each member and assign them roles based on the access you wish to grant them.
Your team members will have personalised access and can use the platform simultaneously. This is especially useful if multiple people are part of the security staff and will need access at the same time to scan tickets on the day of your event.
Follow the steps below:
- Login to your Smeetz account.
- Click on your initials > Account details
- On the account details page > Team
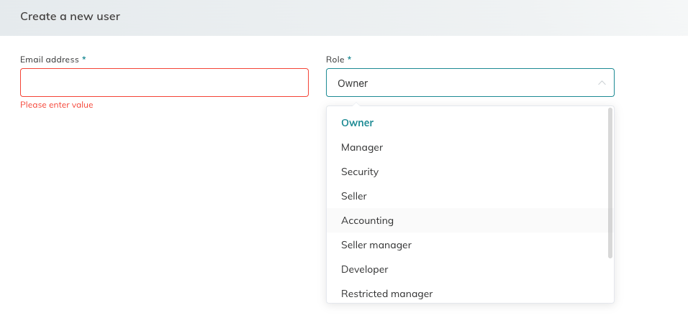
- Click on 'Create user'
- Enter the member's email address and decide on their role (each role is described in Point 3 with the access that will be granted).
- Choose if your new member will have access to all products, or if they are restricted to certain sales groups: (More information about the sales group). You have to make the selection for 3 levels: Create a sale, Scanner, Products and orders.
- If you choose "none", the user will NOT have access to that section
- If you choose "no restriction", the user will have FULL access to that section
- If you choose "specific", the user will have LIMITED access to the sales collection you choose in the second box

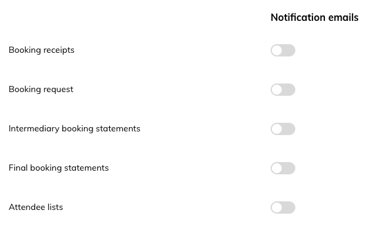
- Then you can select the notification types the users will receive. Keep in mind that they will only receive notifications for the products they have access to.
- Once you save, the new member will receive a verification request by email. Once they select "accept the invitation" and log in afterwards, they will be added as a member of your Smeetz account.
You will now see an overview of all your existing members or pending requests.
2. How to remove members
To delete a member from your Smeetz Account
- Click on the icon next to the person's email
- OwnerClick on "remove"

3. The different roles and accesses
Listed below are the roles and their description/level of access:
- Owner: full access to the Smeetz account
- Manager: access to activities, attendee management, scanner, point-of-sale, and analytics
- Restricted Manager: editing is restricted to Date (of the event), Price & Availabilities, cannot create a product, cannot access analytics
- Accounting: access to booking statements and billing sections
- Seller Manager: same access as Seller with additional access to the attendee lists and vouchers
- Seller: access to the scanner and point-of-sale
- Developer: access to booking widget and integrations
- Security: access only to the scanner
- Read only: access to information without being able to edit anything
| Feature | Owner | Manager | Restricted Manager | Seller Manager | Seller | |
| Create |
Create: - Activity products - Retail products - Booking widgets |
Create: - Activity products - Retail products - Booking widgets |
Create: - Retail products - Booking widgets |
No access | No access | |
| Back-office sale | - Create a sale/quote/ invoice | - Create a sale/quote/ invoice | - Create a sale/quote/ invoice |
- Create a sale/quote/ invoice |
- Create a sale/quote/ invoice |
|
| Product section |
Access and edit: - Activity products - Retail products - Sales collections |
Access and edit: - Activity products - Retail products - Sales collections |
Access and edit: - Activity products - Retail products - Sales collections |
No access | No access | No access |
| Catalogue section |
Access and edit: - Calendars - Retail inventory - Waivers - Seating plan |
Access and edit: - Calendars - Retail inventory - Waivers - Seating plan |
Access and edit: - Calendars - Retail inventory - Waivers - Seating plan |
Access and edit: - Calendars - Retail inventory - Waivers |
No access | |
| Orders section | Access all lists and edit bookings |
Access all lists and edit bookings | Access all lists and edit bookings | Access all lists and edit bookings | No access | |
| Marketing section |
Access and edit: - Customers - Emails |
Access and edit: - Customers - Emails |
Access and edit: - Customers - Emails |
No access | No access | |
| Channels section |
Access and edit: - Marketplaces - Booking widgets - Resellers |
Access and edit: - Marketplaces - Booking widgets - Resellers |
Access and edit: - Marketplaces - Booking widgets - Resellers |
No access | No access | |
| Revenue management |
Access and edit: - Dynamic pricing |
Access and edit: - Dynamic pricing |
Access and edit: - Dynamic pricing |
No access | No access | |
| Analytics section | Access and edit all dashboards | Access and edit all dashboards | No access | No access | No access | |
| Settings |
- Account details - Branding details - Booking statements |
- Account details - Branding details - Booking statements |
- Account details - Branding details - Booking statements |
- Booking statements | No access | |
| Ticket scanner | yes | yes | yes | yes | yes | |
| POS | yes | yes | yes | yes | yes | |
| Voucher manager | yes | yes | yes | No access | No access | |
| Integrations | yes | yes | yes | No access | No access |
| Features | Developer | Security | Accounting |
| Channels | Create booking widgets | ||
| Booking statements | View booking statements | ||
| Ticket scanner | yes | ||
| Integrations | yes |