This article will help you setup your Zebra TC21 scanner.
How does a TC21 scanner work
Here are the basic actions you can take:
- If you click on the circle on the bottom-middle of your screen, it shows all the apps available on your Zebra phone.
- If you click on the inverse triangle, you can go back to the previous activity you were doing on your scanner
- If you go to the top of the screen and scroll down, you can manage all the settings of your phone like wifi, Bluetooth, light preferences. You can also switch off the notifications from the apps if you wish.

How to setup your scanner
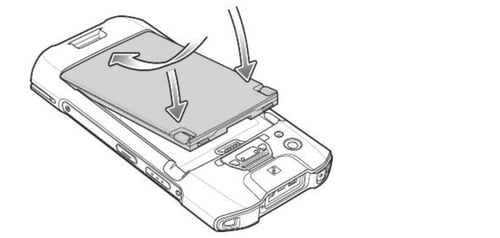
1. Install the battery
- Insert the battery, bottom first, into the battery compartment at the back of the device.
- Press the battery down into the battery compartment until the battery release latches snap into place.
Before using the device for the first time, charge the main battery (the charger is included with your Zebra) until the charging/notification light becomes green. To charge the device use a cable or a cradle with the appropriate power supply.
The standard battery charges from fully depleted to 90% in approximately 3 hours. The extended battery charges from fully depleted to 90% in approximately 4 hours. In many cases, the 90% charge is enough for daily use.
2. Configure the device (administrator settings)
- Connect to wifi (mandatory) > select and connect to a server
- Create a new user with Gmail or connect with your Gmail login
- Define a default language
- For security reasons define a password to block your home screen
- Follow the steps and upload the mandatory apps
After a suspension or screen time-out, the Home screen displays with the lock slider. Touch the screen and slide up to unlock.
3. Add the Smeetz app on your home screen
Follow this procedure to install the app on your Zebra home screen:
- Go to Chrome "app.smeetz.com"
- Click on the three buttons at the top right of your screen
- Click on "Add to Home Screen"
- Rename / place the application where you want
4. Configure the DataWedge
- On the scanner, go to the app DataWedge
- Click on the 3 vertical points at the top right of your screen
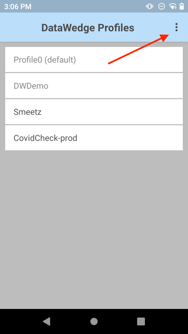
- Select New Profile
- Create a new profile named Smeetz
- Disable the other profiles:
- Tap on the profile
- Uncheck the "Profile Enabled section"
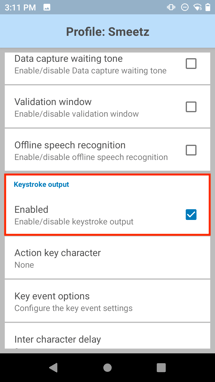
- Go on the Smeetz profile and Enable it ☑
- Click on the associated apps > 3 points > add a new activity > add Android Google Chrome (com.android.chrome, select *) on your new activity
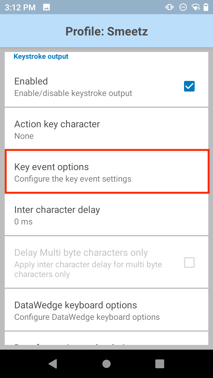
- Go back to the profile and make sure that the following items are Enabled under the Keystroke output section:
- Keystroke Output - Enabled ☑
- Key event options - Characters - Send characters as Events - Enabled ☑
- Keystroke Output - Basic Data Formatting - Send Data - Enabled ☑
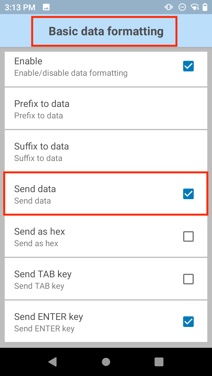
- Keystroke Output - Basic Data Formatting - Send Enter key - Enabled ☑
- Keystroke Output - Enabled ☑
6. Change some settings
- Change the sound settings: press the volume buttons on the device to display on-screen volume controls.
- Display the battery percentage
- And set a longer time before screen get locked
7. Test your scanner
- Click on your app Smeetz and log into your account

- Create a ticket on Smeetz OR scan an existing ticket
- Click on the 9 little squares > ticket scanner
- Select an activity
- Type of scan: scan and validate
- Click on the two yellow buttons on your scanner
- Check if your ticket has been scanned