This article explains how to install POS screen to start onsite sales.
1. Hardware installation
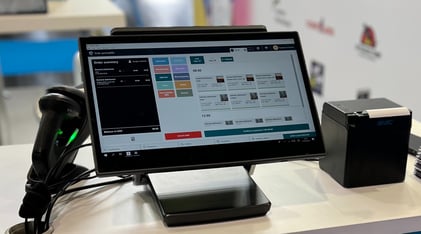
- To connect the screen to the energy alimentation,
- Connect the blue plug to the back of the screen.
- Connect the other part to the energy plug
- Switch on the POS by clicking on the blue button below the screen
- Connect the POS to the internet by ethernet or wifi
2. Point of sale software installation
-
Download the Smeetz POS App file from the link given to you by your Account Manager (the name is Smeetz POS-0.0.9.exe).
-
Add it to a USB key Or have the link accessible from your email on the POS.
- Follow the installation steps according to the video below
- Open the POS App after download (if not automatic)
- If the POS asks you to update the POS App, proceed to the update
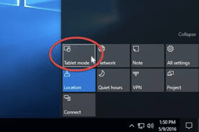
- Process to the POS settings configuration
Make sure that you enable the "Tablet mode" to have access to the virtual keyboard on the POS.
3. Teamviewer installation
This step is very important so our technical team can help you fast in case of issues.
- Download TeamViewer by selecting “TeamViewer Full Client”
.png?width=688&height=95&name=image%20(5).png)
- Install TeamViewer from the file you downloaded
- Launch the software TeamViewer
- To work properly, Teamviewer needs certain access from your system
.png?width=688&height=526&name=image%20(6).png)
- If you are new to TeamViewer, create an account. Otherwise, sign into the software
.png?width=688&height=357&name=image%20(7).png)
- Once you are logged in, go to Settings > Advanced > Password and set a personal password
.png?width=688&height=236&name=image%20(8).png)
- After that go to the Remote control page and copy your ID
.png?width=688&height=291&name=image%20(11).png)
- Tick the boxes: “Start Teamviewer with the system” & “Allow easy access”
- Send your ID + personnel password to Smeetz via email at: support@smeetz.com with the email subject “Customer name - Teamviewer access”
4. General tips
- Install Google Chrome on the POS, this is the most stable browser to use Smeetz (https://www.google.com/chrome)
- Give team members at the cash desk access to the POS to sell tickets.
- Give them the role of "Seller", if you want them to ONLY have access to the POS
- Please ensure you have at least 1 staff member with "seller manager/manager" access rights at the entrance, as access to the back-office may be needed (to access the attendee list or modify bookings).