This article will give you a better understanding of the functionality of add-ons and will help you set them up on your Smeetz account.
1. Description of add-ons and advantages
Cross-selling is a simple sales technique that offers complementary products, add-ons, to your existing products in order to offer a variety of choices to your customers and to increase your revenue.
You decide in advance and in total flexibility to which tickets you wish to add a cross-selling option so that your customers can enjoy a unique experience. For this reason, add-ons should be chosen carefully according to the behaviour of the customers.
During the booking process, your clients will be able to select their tickets and then choose the add-on of their choice.
There are 2 types of add-ons available
- Add-ons within the first screen of the booking flow
- Add-ons within an intermediary page of the booking flow
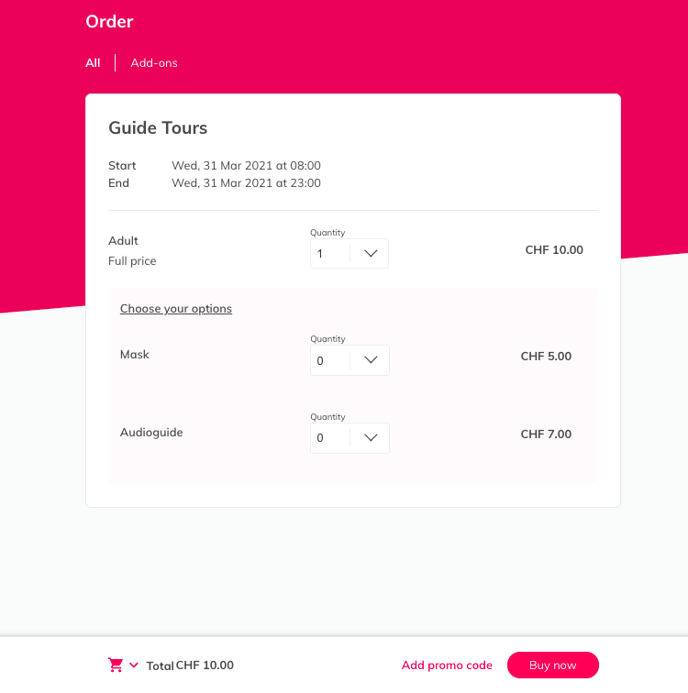
Example of an online booking flow with add-ons on the first screen of the booking flow
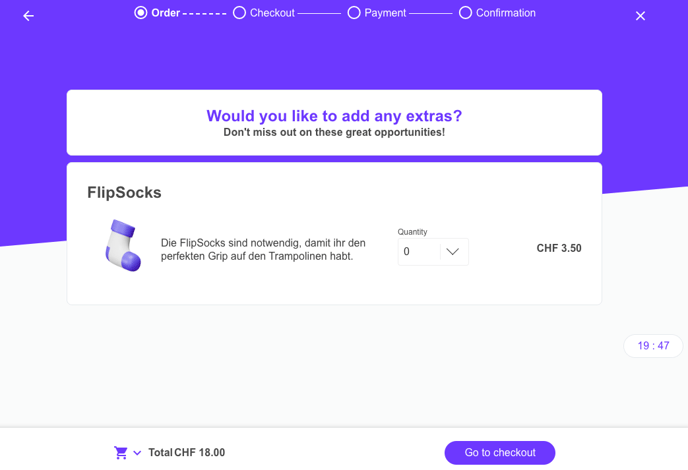
Example of an online booking flow with add-ons on an intermediary page of the booking flow
2. How to setup add-ons
There are 3 steps for setting up add-ons. Firstly, you need to have a base product/ticket that you want to add a cross-selling option to (for example entry to your trampoline park). Secondly, you need to create add-ons tickets (for example socks to jump), and thirdly you need to associate the add-ons with the base ticket.
1. Create the base product with its tickets
To start with, you need a base product, after which add-ons will be offered. If your base product does not exist yet, you need to create one. After creating the product, you must create tickets for it. For more information, please refer to this article.
2. Create add-ons tickets
An add-on is a ticket that you associate with a product/ticket group. You can either create additional tickets for each add-on or reuse standard tickets.
These tickets will not be visible to your customers if you remember to uncheck the online availability box.
Go to "Products" > Select a product > "Tickets" > "Create a ticket"
To use a ticket as an add-on, you may choose between these 3 types of tickets:
-
Ticket with recurring dates: choose this option if your add-ons are recurring every day over a long period of time.
-
Ticket with a single date: choose this option if your add-ons are specifically recurring on a single date.
-
Gift card ticket: choose this option if you want to add add-ons in the form of gift cards or vouchers from you or one of your providers.
When you set up your Add-on ticket:
Please note that the name of the add-on which is visible on the booking flow is configured under the "price" tab.
You can therefore add the name of your add-on and a short description about your additional ticket. Please add the description below the price name section as shown in the image below:

3. Configuration and association of add-ons to a product
At this stage, you need to return to your main product in order to proceed to the configuration process of the add-ons on the main tickets.
- Products > click on the desired product > Tickets > choose the ticket, which will suggest an add-on > Add-ons
-
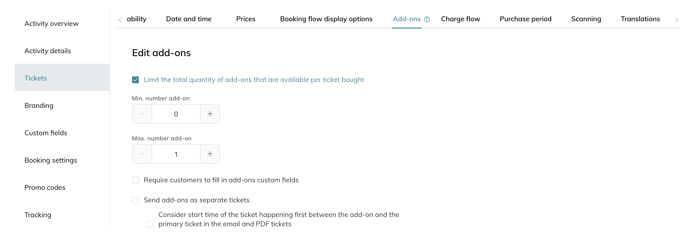
In this section, you have the option of:
- Limit the number of add-ons per ticket
- Require customers to fill in custom fields in order to obtain additional information
- Send add-ons on separate tickets in order to provide flexibility to your customers
- Then, click on Add add-on
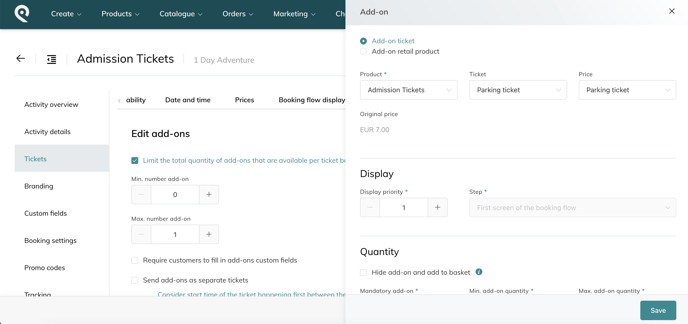
Here are the elements to be filled in to link an add-on to a ticket:
- Add-on ticket:
- Choose the product under which the add-on has been created
- Then the exact ticket of the add-on
- And its price
- Display
- Select the display priority to order the add-ons
- Select the location of the add-on (first page or intermediary page)
- Quantity:
- Choose whether the add-on is set by default as hidden or displayed in the booking flow. If the add-on is defined as hidden, then it will automatically be added to the client’s order when the main ticket is purchased.
- If the add-on is visible to the end customer
- Select if the add-in is mandatory or not (ex: an audio guide is needed to visit XYZ museum, you can set that each ticket requires no more and no less than one audio guide as an add-on.)
- Min. add-on quantity per ticket
- Max. add-on quantity per ticket
- Price:
-
- Select if the add-on price is included in the main ticket price (if not, customers will pay the price of the add-on + the price of the ticket selected)
- Select the price the customers have to pay for the add-on
- Availability of add-ons
- Limit the display of add-on on selected ticket prices (associate the add-ons to the main price)
3. Cancel and modify add-ons
1. Cancellation of an add-on
Products > click on the desired product > Tickets > Select a ticket associated with an add-on you wish to cancel > Select Add-ons in the top horizontal list > click Remove add-on > Save.
2. Modifying an add-on
Products > click on the desired product > Tickets > Select a ticket associated with an add-on you wish to modify > Select Add-ons in the top horizontal list > click Edit add-on > you can now change the add-on's price and availability > you can now validate your new desired setting by clicking Save.